Day12 Eメール送受信サービスSESとキューイングサービスSQS
Amazon SES
1. ドメインを登録する
Amazon SES→Domains→Verify a New Domain
2. Route 53に紐づけする
Domain:ドメイン名を入力 Generate DKIM Settingsにチェック
Route 53に登録しているドメインなので、Use Route 53→Create Record Sets Route 53のドメインのホストゾーンにレコードが追加される
3. メールアドレスを事前登録する
Amazon SES→Email Addresses→Verify a New Email Address
上限緩和申請をしないと、事前に登録したメールアドレスにしかメールを送信できない。
4. マネージメントコンソールから送信
Domains→Send Test Email
事前登録していないアドレスに送ろうとすると、
Email address is not verified. The following identities failed the check in region US-EAST-1
と出る。
5. SDK for PHPでメッセージを送信する
batchインスタンスに接続
<?php
require '../vendor/autoload.php';

use Aws\Ses\SesClient;

// バージニア北部リージョン以外を利用している場合は、region を変更すること
$ses = SesClient::factory(array(
  'version'=> 'latest',
  'region' => 'us-east-1',
));

try {
  $result = $ses->sendEmail([
    // TODO: 送信元メールアドレスの入力
    'Source' => '***@***.***',
    'Destination' => [
      'ToAddresses' => [
        // TODO: 送信先メールアドレスの入力
        '***@***.***',
      ],
    ],
    'Message' => [
      'Subject' => [
        'Charset' => 'UTF-8',
        'Data' => 'Hello SES World!!',
      ],
      'Body' => [
        'Text' => [
          'Charset' => 'UTF-8',
          'Data' => 'AWS SDK for PHP を使った SES 送信テストです。',
        ],
      ],
    ],
  ]);

  $messageId = $result->get('MessageId');
  echo("Email sent! Message ID: $messageId"."\n");

} catch (SesException $error) {
  echo("The email was not sent. Error message: ".$error->getAwsErrorMessage()."\n");
}
> php SendEmail.php
Email sent! Message ID: xxxxxx-xxxxxx-xxxx-xxxxx
[ec2-user@udemy-aws-14days-batch src]$ php SendEmail.php
PHP Fatal error:  Uncaught exception 'Aws\Ses\Exception\SesException' with message 'Error executing "SendEmail" on "https://email.us-east-1.amazonaws.com"; AWS HTTP error: Client error: `POST https://email.us-east-1.amazonaws.com` resulted in a `403 Forbidden` response:
<ErrorResponse xmlns="http://ses.amazonaws.com/doc/2010-12-01/">
  <Error>
    <Type>Sender</Type>
    <Code>AccessDenie (truncated...)
 AccessDenied (client): User ' is not authorized to perform ses:SendEmail' on resource `arn:aws:ses:us-east-1:303167122504:identity/' - <ErrorResponse xmlns="http://ses.amazonaws.com/doc/2010-12-01/">
  <Error>
    <Type>Sender</Type>
    <Code>AccessDenied</Code>
    <Message>User ' is not authorized to perform ses:SendEmail' on resource `'</Message>
  </Error>
  <RequestId>4aa5cba6-21d9-11e9-96 in /home/ec2-user/vendor/aws/aws-sdk-php/src/WrappedHttpHandler.php on line 191
アクセス権限のエラーが出る場合は、Batchに割り当てられているIAMロールにAmazon SESのアクセス権を追加して、ポリシーを一度デタッチして、もう1度アタッチするとメールが送れるようになる。
バウンス処理について
SNSと組み合わせることでメールが正しく送信できたかを取得することができる、
もしメールが送信できなかった場合、該当するメールアドレスを削除することができる
- バウンスの例
DBから送信先を取得→メール送信→メール送信に失敗→トリガ→DBから送信先のメールアドレスを削除
Amazon SQS
処理の間にQueueを噛ませることで、非同期処理にできる。
1度に複数件のメッセージを登録/取得できる
Long Polling: キューが空の場合はタイム・アウトするまで待ち続ける
Dead Letter Queue: いつまでも残っているメッセージを別のキューに移動する
Delay Queue(Message Timer): 新しいメッセージを指定した時間見えなくする
注意点:
順序は保証されない
同じメッセージを複数回受信する可能性がある(標準キューとFIFOキュー)
aws.amazon.com
1. キューを作成する
Amazon SQS→新しいキューの作成 デフォルトで標準キューで作成する
キューの操作→メッセージの送信 利用可能なメッセージの数が増えている。
キューの操作→メッセージの表示/削除 メッセージのポーリングを開始で受信できる
2. マネジメントコンソールからメッセージを送受信する
メッセージの送信
<?php
require '../vendor/autoload.php';

use Aws\Sqs\SqsClient;
use Aws\Exception\AwsException;

date_default_timezone_set('Asia/Tokyo');

$client = new SqsClient([
    'region' => 'ap-northeast-1',
    'version' => '2012-11-05'
]);

$params = [
    'MessageAttributes' => [
        "Sender" => [
            'DataType' => "String",
            'StringValue' => "AmazonSQS test"
        ]
    ],
    'MessageBody' => date('YmdHis'),
    //TODO: Queue の URL を記載する
    'QueueUrl' => '***'
];

try {
    $result = $client->sendMessage($params);
    var_dump($result);
} catch (AwsException $e) {
    error_log($e->getMessage());
}
作成したキューのURLを入れる。
> php SendQueue.php

object(Aws\Result)#142 (2) {
  ["data":"Aws\Result":private]=>
  array(4) {
    ["MD5OfMessageBody"]=>
    string(32) "xxxx"
    ["MD5OfMessageAttributes"]=>
    string(32) "xxxx"
    ["MessageId"]=>
    string(36) "xxxx"
    ["@metadata"]=>
    array(4) {
      ["statusCode"]=>
      int(200)
      ["effectiveUri"]=>
      string(62) "https://sqs.ap-northeast-1.amazonaws.com/xxxx/キュー名"
      ["headers"]=>
      array(4) {
        ["x-amzn-requestid"]=>
        string(36) "xxxx"
        ["date"]=>
        string(29) "Sun, 27 Jan 2019 06:51:48 GMT"
        ["content-type"]=>
        string(8) "text/xml"
        ["content-length"]=>
        string(3) "459"
      }
      ["transferStats"]=>
      array(1) {
        ["http"]=>
        array(1) {
          [0]=>
          array(0) {
          }
        }
      }
    }
  }
  ["monitoringEvents":"Aws\Result":private]=>
  array(0) {
  }
}
メッセージが送信される。
メッセージの受信
<?php
require '../vendor/autoload.php';

use Aws\Sqs\SqsClient;
use Aws\Exception\AwsException;

//TODO: Queue の URL を記載する
$queueUrl = "****";

$client = new SqsClient([
    'region' => 'ap-northeast-1',
    'version' => '2012-11-05'
]);

try {
    $result = $client->receiveMessage(array(
        'AttributeNames' => ['SentTimestamp'],
        'MaxNumberOfMessages' => 1,
        'MessageAttributeNames' => ['All'],
        'QueueUrl' => $queueUrl, // REQUIRED
        'WaitTimeSeconds' => 0,
    ));
    if (count($result->get('Messages')) > 0) {
        var_dump($result->get('Messages')[0]);
        $result = $client->deleteMessage([
            'QueueUrl' => $queueUrl, // REQUIRED
            'ReceiptHandle' => $result->get('Messages')[0]['ReceiptHandle'] // REQUIRED
        ]);
    } else {
        echo "No messages in queue. \n";
    }
} catch (AwsException $e) {
    // output error message if fails
    error_log($e->getMessage());
}
> php ReceiveQueue.php

array(7) {
  ["MessageId"]=>
  string(36) "xxxx"
  ["ReceiptHandle"]=>
  string(412) "xxxx"
  ["MD5OfBody"]=>
  string(32) "xxxx"
  ["Body"]=>
  string(14) "20190127155425"
  ["Attributes"]=>
  array(1) {
    ["SentTimestamp"]=>
    string(13) "1548572065941"
  }
  ["MD5OfMessageAttributes"]=>
  string(32) "xxxx"
  ["MessageAttributes"]=>
  array(1) {
    ["Sender"]=>
    array(2) {
      ["StringValue"]=>
      string(20) "Amazon SQS Send Test"
      ["DataType"]=>
      string(6) "String"
    }
  }
}
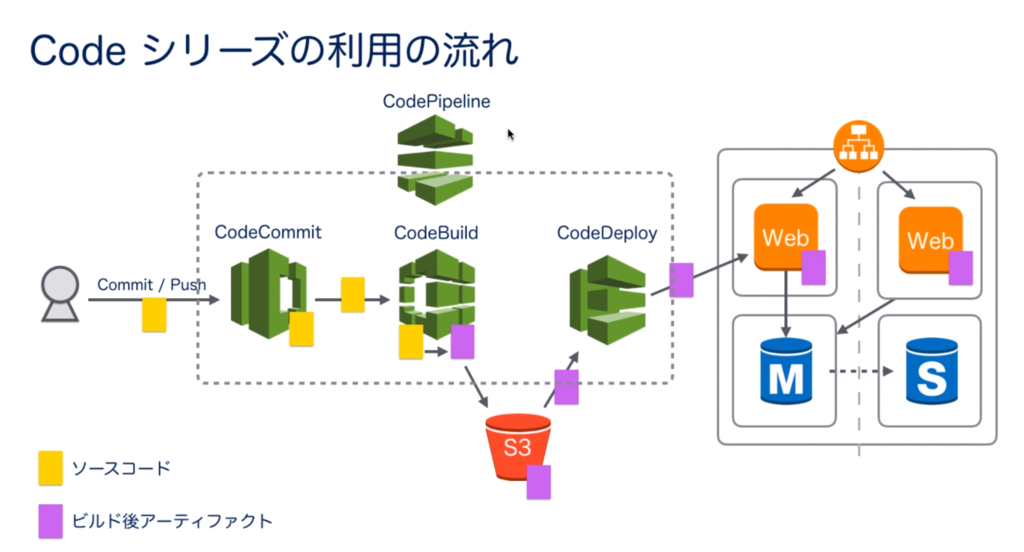
Day13 アプリケーション開発を支援するCodeシリーズ

CodeCommit
Gitリポジトリをホストする
> mkdir work
> cp -r udemy-14days-aws/Day13/* work/
IAMユーザの権限を使ってgitの設定をするので一応、aws configureで権限を確認する。
gitの設定
git config --global credential.helper '!aws --region ap-northeast-1 codecommit credential-helper $@'
git config --global credential.UseHttpPath true

git config --global user.email "user_email"
git config --global user.name "user_name"
git clone
git init
git remote add origin 作成したリポジトリのURL
// ステージに追加
git add -A
// コミット
git commit -m "first commit"
// プッシュ
git push origin master
CodeBuild
CodeBuild上で行う作業については、buildspec.ymlに定義する
1. Build後のファイルを格納するためのS3を作成する
バケットを作成、バージョニングを有効にする
2. buildspec.ymlの編集
アプリケーション名・作ったS3のバケット名を入力。
version: 0.1

phases:
  build:
    commands:
      - aws deploy push --region ap-northeast-1 --application-name application-name --s3-location s3://S3-bucket-name/sample.zip --source src
artifacts:
  files:
    - '**/*'
  base-directory: src
  name: sample.zip
3. CodeBuildの作成
CodeBuild→ビルドプロジェクトを作成する プロジェクト名: buildspec.ymlで設定したアプリケーション名
環境 オペレーティングシステム: Ubuntu ランタイム: PHP
サービスロール S3やCodeDeployに接続するための新しいロールを設定する
ビルドプロジェクトを作成する
- CodeBuildで作成したIAMロールの設定
ポリシーをアタッチする
AWSCodeDeployDeployerAccess
AmazonS3FullAccess
CodeDeploy
EC2インスタンス用のIAMロールを作成する ロールの作成→EC2
S3のアクセス権を設定
Web-1a, Web-1cに作成したDeploy用のロールを割り当て各EC2インスタンスにCodeDeployエージェントをインストール
wget https://aws-codedeploy-ap-northeast-1.s3.amazonaws.com/latest/install
chmod +x install
sudo ./install auto
CodeDeploy→アプリケーションの作成 アプリケーション名: buildspec.ymlのアプリケーション名 コンピューティングプラットフォーム: EC2/オンプレミス
デプロイタイプの設定 アプリケーション→デプロイグループの作成 デプロイタイプ:インプレース
環境設定 EC2インスタンス Web-1aとWeb-1cを登録
ロードバランサー ロードバランシングを有効にするにチェック 片方のEC2インスタンスがデプロイ中は切り離して、終わるともう片方のインスタンスをデプロイするという処理にできる
実際にビルドしてデプロイする
batchインスタンスに接続
cd work
git status
modified buildspec.yml
git add -A
git commit -m 'update buildspec.yml'
git push origin master
ビルド CodeBuild→ビルド→ビルドプロジェクト→ビルドの開始
デプロイ CodeDeploy→デプロイ→アプリケーション→デプロイの作成 デプロイグループ・リビジョンの場所を選択→デプロイ
デプロイ→イベント
BlockTraffic 5 分 45 秒
EC2のターゲットグループの登録解除の遅延を300秒から短くすると、デプロイにかかる時間が短くなる
CodePipeline
パイプラインの作成
パイプライン設定の選択
サービスロール:新しいサービスロール
アーティファクトストア:カスタムの場所 デプロイ用のバケットを選択ソースステージの追加
ソースプロバイダ:AWS CodeCommit
変更検出オプション: AWS CodePipelineビルドステージの追加
ビルドプロバイダ: AWS CodeBuild
プロジェクト名を選択:ビルドプロジェクト名を選択デプロイステージの追加
デプロイプロバイダ: AWS CodeDeploy
アプリケーション名:
デプロイグループの選択
パイプラインの作成
 git pushすると自動でデプロイされるようになる!